Beka To Basics

Real Food Cooking

Archive for the category “Basics”

An apology, an explaination, and two experiments

So… It’s been a long while and I feel like I need to apologize.  I disappeared with no warning or explanation.  I disappeared for a good reason though.  See below 😀

IMG_0980

The lease at our apartment ended in January and we moved in with my grandma.  I cooked plenty while I was there, but I wasn’t very creative.  But, I’m back in my own house and this year, I might even be able to garden along with my cooking.  I’m going to give it a go.  We’ll see how green my thumb is.

On to the experiments.

I’ve been making my own cleaner with vinegar and water for a while.  It  super cheap and really does a good job of cleaning, but it IMG_0050smells like vinegar (of course).  The smell dissipates pretty quickly, but it’s extremely noticeable while actually cleaning.  I looked around the internet for some suggestions.  I found one and I’m hoping it works.  You soak orange peels in vinegar for a few weeks and use that instead of the regular vinegar.  I’m a little skeptical about the vinegar getting sticky from the oranges, but we’ll see.

The second one is vanilla extract.  I love using it, but I hate buying it.  It’s like $10 out of the weekly grocery budget and even though I know a little bottle takes a long time to use IMG_0051up, I still hate when I have to get more.  Instead, I found this recipe using vodka and decided to give it a shot (get it?).  I’m pretty sure it will work because it already looks darker and smells like vanilla and it’s only been a couple weeks.  Unfortunately, I won’t know for sure for another month and a half.  I’m really glad she mentions most store bought extracts have simple syrup in them, so when I can use this batch, I’ll need to figure that into my recipe.  Theoretically, you can just keep adding more vodka as you use it.  That is the part I really like – having a never ending supply of vanilla extract.  I’m sure at some point the beans will loose their kick, but hopefully it will be years from now.

Barbeque Sauce

So, I know I already talked about BBQ and Brie pizza, but it was really good, so I had to make it again.  This time, my barbeque sauce was amazing!  To top it off, I made sourdough pizza crust that was so good and only slightly sour.  Next, I need to work on the New York style crust I love so much.

IMG_0828I’ve been attempting to recreate lots of sauces instead of buying them at the store.  I like knowing what I’m eating and a lot of sauces have ingredients that I don’t know how to pronounce or why they’re there.  Plus, it’s actually a lot cheaper to make my own.  I’ve gotten catsup/ketchup down, so I decided to use that for the base.  I also spent some time looking at other people’s recipes and the list of seasonings from various companies’ barbeque sauces.  I pulled out everything I thought I would need and got started.  The recipe is for a small amount, about 1/2 cup, but I didn’t want to risk wasting too much if it didn’t work out.

Barbeque Sauce

  • 1/2 cup catsup
  • 2 tbsp brown sugar
  • 2 tbsp Worcestershire sauce (make your own with this recipe from Food Renegade)
  • 1 tbsp cider vinegar
  • hot sauce
  • 1-2 tbsp honey to taste
  • 1-2 tbsp blackstrap molassas
  • 1 tsp onion powder
  • 1/4 – 1/2 tsp mustard powder
  • 1/2 tsp paprika

Mix it all together and simmer over low heat until it has thickened slightly.  This sauce is sticky, tangy and sweet and can easily be changed to make is spicier.  Maybe use more honey to have a sweeter sauce or add some yellow mustard for a tangy sauce.  Add some garlic powder, or if you are going to eat it quickly, use fresh garlic and chopped onions.  I’m pretty sure it would all be good.  I can’t wait to try this sauce on a barbeque sandwich or for dipping chicken nuggets!

Pasta

Have I talked about pasta yet?  Probably.  But leave it to me to not check first.IMG_0215

Christmas 2011, Mom gave me a pasta maker and it’s still probably my most favorite kitchen tool.  Least practical favorite kitchen tool? Yes. But that’s ok, we all have our faults. 😉

I enjoy making pasta with it.  I didn’t get the kind that has a motor, so I hand crank sheets of pasta.  It came with a cutter that would make fettuccine and (kind of) spaghetti noodles.  Well, I broke the cutter, so I cut the sheets with a pizza cutter instead.  It did take a while to figure out the best consistency for the pasta dough, but it has gotten easier for me to correct mistakes.  I broke the cutter when I tried to take it apart to clean it after forcing a too wet pasta dough through.  Bad idea.  It is impossible to put back together.  Now that I’m better with the consistency, I haven’t had many problems like that.

You don’t have to have a pasta maker to make pasta.  I mean you will be doing all of the work yourself anyways, the pasta maker just presses the pasta.  It’s a lot easier with the pasta maker, but it’s not required.

IMG_0823
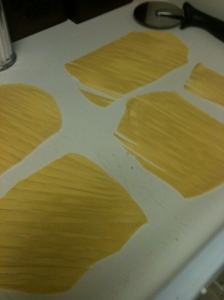
Patience is key with pasta.  There’s a bit of mixing, then kneading, then rolling, then cutting, then cooking.  All before you can eat one bite.  Ok, that’s not completely true.  I’ve eaten “raw” pasta before.  It chewy and tasty, but not something I want to sit down to a bowl of.

I use the recipe from Bob’s Red Mill Semolina Flour, except that I typically half it unless I want to have a lasagna or a lot of leftovers.  It’s a good place to start before playing with flavored pasta.  I’ve done spinach pasta and basil pasta.  I would like to try red pepper and maybe a spicy noodle soon.

What I haven’t really mastered is the Tomato Sauce.  I can do Alfredo, sometimes herbs, butter and pepper is good too.  I use the pasta as noodles in soup, but I just haven’t been able to get a sauce that I really liked.  Until now.  And I’m sharing.

Tomato Sauce

  • 1 quart jar of crushed tomatoes or a big can (28 oz?)
  • an olive oil and butter mixture totaling about 2 tbsp
  • 2 cloves garlic, chopped
  • rosemary
  • basil
  • parsley
  • sage
  • thyme
  • oregano
  • salt and pepper
  • any other green herb you like, marjoram and tarragon are both good
  • sour cream

Ok, my recommendation for cooking pasta sauce is to use the BIGGEST pot you have.  Yes, even though you are only cooking a jar IMG_0824of sauce, it will boil and splatter and your largest pot will help to catch some of the splatters.

Melt the butter and olive oil and add the herbs.  I don’t include measurments beause its really a matter of taste, but I had a total of about 1 1/2, maybe 2 tbsp, heavy on the basil and oregano. Do what you like, but saute them first.  Then add the garlic and saute a few more minutes.  Add the tomatoes and bring to a simmer.  Simmer for 20 minutes or longer.  If you want to simmer for hours like some recipes call for, I would start with more tomatoes since they will cook down.

IMG_0825
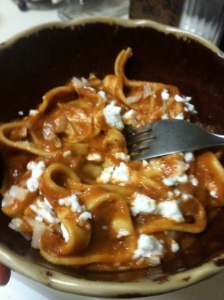
If you are making your own pasta, now is the time to roll it out and cut it.  You can cook fresh pasta right in the sauce, which is really nice.  Add the noodles in and cook 5 – 10 minutes until they are done.  If you are using dried pasta, then cook as normal then add to the sauce.  Once everything is together, turn off the heat and let it cool for a few minutes, then add some sour cream.  A tsp or a few tbsps.  Taste as you go to decide if you want more.  Top with a little feta or Parmesan (perhaps both?).

Sour Beginnings

So, I think I’ve neglected to introduce you all to Wally.

Wally is a friend that I neglect. A lot. Well, maybe he’s more of a pet. In any case, I get the worst friend/pet owner award. Ever.

The last time I saw Wally was when I attempted this. And before that, was this. That was in March. It’s December.

I think I remembered to feed him in April, but like I said before. It’s December.

He has been sitting in the back corner of my fridge, alone, cold, unused. For Months.

I really thought I had killed him. I mean nothing can live without eating for eight months. I decided it was time to find out and…

Wally - the sourdough starter

Wally – the sourdough starter

Bam! HE’S ALIVE!!!!

Wally, the sourdough starter made it. That’s him a few hours after being fed, all happy and bubbly.

And yes, I named him.  He IS like a pet – you feed him, change his water, take him out, put him in a crate (jar) and in return you get to make sourdough bread, or muffins, or pancakes, or cinnamon rolls. Why Wally?  It just felt right. 😉

If you’re not sure about sourdough, it works something like this.  You “catch” yeast from the air by leaving out a flour and water mixture until it starts to bubble.  When it starts bubbling, add more water and flour to feed the yeast.  When you’re ready to make bread, or whatever you’re making with it, use the starter instead of store bought yeast. There are a lot of recipes to make a sourdough starter, but you can also buy one from plenty of online stores. Or just ask me, I can give you a Wally Jr.

IMG_0796Some people use enough of their starter to leave it out and feed it twice a day.  Well, when I started mine, I knew that wasn’t going to be for me.  Luckily, you can store the starter in the fridge and pull it out once a week or so to feed and/or use some.  That sounds more like me. And I was really good about it for a while. Until I wasn’t.  So he sat, and sat for a long time. Probably plotting his revenge.

I pulled him out of the fridge late last week because I was inspired by a Sourdough PancakeIMG_0797 recipe that was posted to my facebook news feed. I read it thinking, this is so easy.  There’s no waiting.  Usually sourdough takes overnight or at least a few hours. I know, I know, all bread takes time, but sourdough is different.  And by different, I mean much slower.  Wally has taught me a lot of patience.

Well, when I saw this recipe for sourdough pancakes, I really had to make them.  Saturday Morning, I mixed all the ingredients, fried some pancakes and sat down to eat.  They. Were. Sour.  I think the amount of sour in the starter is directly related to how angry he is for all the neglect you’ve put him through.

It’s ok though.  Wally and I? We made up and I made the same sourdough pancake recipe on Sunday.  He was MUCH happier on Sunday and the pancakes had the perfect touch of sourdough taste to complement the cinnamon and syrup topping.

Since then, I’ve made Sourdough Crepes and Pan Cubano.  The latter isn’t fully sourdough, because the second rise uses added yeast.  The recipe doesn’t even call for true sourdough starter, but I used mine instead of making a mini starter like the recipe instruct.  What to do with Pan Cubano?  Well, Cuban Sandwiches of course!

IMG_0799

Linked to Freaky Friday.

Happy Birthday Bread!

So, it’s official.  I haven’t purchased bread for a whole year!

I suppose it’s technically not really bread’s birthday, since people have been making bread long before I started, but it is a milestone for me. 🙂
When I first started, it felt like I would never get the hang of it.  I started to think that I would have to just cough up the extra money to buy bread that doesn’t have any weird ingredients in it.  There were a lot of flat breads because they just didn’t rise.  I had quite a few ‘flying crusts.’  That’s when there’s a huge gap between the loaf and the crust.  I also had some over risen bread that fell while it was baking. Others had huge gaps throughout the loaf.  Some were really crumbly, some were really dense.  Some tasted bad.  Most at least tasted good, but depending on the consistency, many became croutons or breadcrumbs instead of sandwich bread.  However, it got a lot easier as I made more bread.  Once I got a feel for what dough should look like for sandwich bread and what it should look like for buns or for pizza, I had a lot more success.  It also helps to understand what a recipe is saying when it describes the dough as loose or elastic.

It also felt like it was taking a lot of my time when I first started baking.  Now, I just work it into whatever else I’m doing.  Start dinner, mix bread, let it rise while I eat and then bake it.  I really only spend a lot of time baking it if I’m trying something new.  And for the weeks I really don’t feel like baking?  Well, there’s an easy answer for that… We don’t eat bread for a week.

It does take time to learn and get comfortable with baking bread.  It also takes time out of my day, even though I’m more used to dedicating time to it now and fitting it in to where ever it will fit.  It is totally worth it.  I don’t even want store bought bread anymore, the taste cannot compare to fresh bread and never will.
Next on the list is really learning how to cook a real sourdough loaf…

Cat Pic!

You are what you eat

So, I have mostly kept my mouth shut about this year’s elections, propositions and questions going to the voters, but I feel like I have to comment on something at this point.  Proposition 37 appears to have failed in California.  If you don’t know what it was, it would have required labeling of genetically modified foods sold in the state.

Opponents of GMO labeling claim that there is no inherent difference between traditional crops and GMO crops and that labeling them will cause unnecessary fear and bias against the products with GMOs in them.   They have also said that labeling will cost the consumer a substantial increase to their grocery bill.  Don’t they have to have labels anyways?  How much would it cost to add another line to a label that they already have to print?  As for the fear and bias, I seriously doubt many people will stop buying certain products just because there is a GMO in the ingredient list.  Europe already requires GMO labeling and no significant difference in purchasing has been noticed.

PS.  The companies who export products with GMOs to Europe ALREADY print two labels – one indicating GMO ingredients, and another for the US.  Tell me if it would be more difficult to print one label or continue printing two…

I don’t know the answer about whether or not GMOs have any long term health issues or not.  Maybe they do, maybe they don’t.  Some studies say your body can’t tell the difference between GMO and non-GMO, others have found it causes infertility and other health problems.  These studies go either way depending on who funded them, but I do believe everyone has a right to know if these ingredients are being used in their food or not and choose accordingly.  Just like I want to know if there are peanuts or trans fats and what vitamins are in the food I purchase.  In order to choose, you have to have complete information.  How can we really know what’s in our food if the labels aren’t accurate?

And yes, I know, this proposition was up for vote in California, not Virginia.  However, if one state requires it, then at least there’s a foot in the door for the rest of us.

There are ways to show that you support labeling in your own state.  You can find them here: Just Label It  and here: Communicating with Congress
If you’d like to know more, here’s a few links to get you started.  You might be surprised by what you find.

Posted in: Fat Tuesday, Real Food Wednesday, Fight Back Friday, and Freaky Friday.

The Gleaning

It feels rather ominous to use that word.  I can’t describe it any better than that, ominous.  Also ominous?

The Reaping

Maybe that’s what it’s making me think of.  But why would farming terms make me feel like something bad is going to happen?  Why are they used in horror movies?  Really, reaping and gleaning HAVE to come after sowing.  And ALL of it has to come before eating.

Enough of light philosophical thinking. 🙂

My CSA ended and I’ve had a week to think about it.  I really enjoyed it, but not at first.  You have to change the way you think about eating and deciding what to eat.  I have always thought about what I want, made a list, gone to the store and cooked what I bought.  It backwards.  You can’t tell what veggies to be ripe when you want them to be.  You can’t will it to be spring, with it’s strawberries and salad greens.  You have to work with what’s ready.

I was really resistant to that at first.  In fact, I hated it.  I thought every week – now I have to figure out how to fit all of this freaking food into my already made plan.  Wrong.  Try again.

Embrace it.  Realize that what you have actually makes it’s own plan.  There are SOME things you have to think about.  Like a bitter melon, or a quince, but there’s a reason so many eggplant recipes also have tomatoes.  They are ready at the same time.  Think about how we used to eat, before we had easy access to anything we wanted at any time we wanted.  We had to eat what we could find, when it was ready to eat.

Once I got over planning meals and then getting food and switched my thinking to getting the food and then making something with it, I really started to enjoy it.  It started to come really naturally.  Once a week, I would get an email telling me what was coming the next day and I already had a plan for the upcoming week.  Almost without having to think about it.  I’m telling you, it was liberating.  If food can be liberating, I suppose.  Maybe I’m blowing my experience out of proportion, but I figured I would share.

Now, back to THE GLEANING

After the CSA ended, my farmer (yes, I refer to him as my farmer 🙂 ), invited the share holders out to his farm. To glean.  So, to glean I went.  I got some extra veggies and two dozen eggs and enough garlic to last through the winter. That is if I don’t just roast it up and eat it like popcorn in one sitting.  Have you ever seen garlic on it’s stalk, drying out?  Yeah, I brought a bunch home. 😀


Featured in the Food Festival: Fat Tuesday.

And the moment you’ve all been waiting for…

Chili.

Yes, that’s right.

Chili since its chilli outside.

But first, I have to tell you about Wednesday.  It’s probably my favorite day of the week (well, not really, but almost). Why?  Because it’s milk day!!!  I pick up milk, come home, change into some PJs, and pour a giant glass of delicious milk.  Now that I’m all settled, milk in hand, I’m ready to tell you about Chili.  So, pour yourself a glass and take a seat.

I am not afraid of eating hot foods all summer. In fact, as everyone knows, I’m not even afraid of soup in the summer. I rather enjoy it.  But that’s already been established.  There are a few things, however, that I just don’t make until Fall has started and I don’t make them after Spring has begun.  I’m talking about the Autumnal Equinox and the Spring Equinox.  This is serious and I mean it.  Ask anyone who has requested one of these dishes in the middle of the summer.  They’ll tell you.  The answer is, “Wait until the Fall.”

I don’t know why I’ve established these rules, but it just feels right and now it’s a mini tradition.  Plus it’s fun to make people wait for it.

Chili is one of those dishes.  It’s one of my specialties.  Seriously, this isn’t the best chili ever.  It’s not even a real chili, in the traditional sense.  I guess it’s a type of American Chili.  I’ve been debating on whether or not to even share the recipe since it’s one of my favorites to make for friends and family.  But, I’m feeling giving today 😉 so here you go!

One more thing, the ingredient list is a little bit daunting. I know that. Use what you have and forget what you don’t.  It’ll still be good.

Beka’s Chili

  • 1 red bell pepper
  • 1 green bell pepper
  • 1 onion
  • 2 cloves garlic
  • 1 1/2 cup baked beans (wanna make your own?  Don’t worry, I’ll have a recipe soon)
  • 3 cups kidney beans
  • 3 cups pinto beans
  • 1 1/2 cup corn
  • 1 lb ground beef
  • 1/2 cup tomato sauce or tomato paste

Are you ready for the seasonings?  I did warn you this list was long…

  • 2 tbsp Chili Powder
  • 2 tbsp Paprika
  • 1/2 tsp Cayenne Pepper
  • 1/2 tsp Curry Powder
  • 1 tsp Onion Powder
  • dash Nutmeg
  • 1 Cinnamon Stick – Broken in half
  • 1 Bay Leaf
  • a splash of Apple Cider Vinegar
  • salt and pepper

Ok, now let’s take a breath.

Ready? OK.

Chop the veggies and saute in olive oil until they are almost soft.  Add the garlic and saute until fragrant.  Add the spices, except for the Vinegar and saute a little bit longer.  Add the tomato sauce.  Add all the beans and corn and a little bit of water or stock to loosen everything up.  Simmer this mixture while you cook and drain the beef and then add the beef in. Taste it and add salt and pepper as needed and maybe a little bit more of anything else it might be lacking.  Stare at your spice cabinet (ahem, wall) and something will jump out at you that just has to be added 😉  At least that’s usually my method.  Add a splash of Vinegar.

I recommend making this AFTER you’ve eaten dinner and waiting until the next day to eat it.  It’s much better that way.  Still good fresh, but better after a day.

So, there you have it! The Chili I make people wait for. I hope you like it as much as they do!

And a Kitty Cat picture, just ’cause I think she’s cute!

Lazy Potato Leek Corn Soup

I need to confess, I ordered pizza this weekend instead of making it. (Oh, the horror, the horror)

I want to see if anyone else does what I do when I order pizza.  Instant regret.  It comes, I eat it.  Then, I start to think about how much I paid for dough, sauce, cheese and toppings.  I have everything I need to make a pizza in my cupboards and fridge and it would have been a lot cheaper.  But making it would have involved work, so it’s a trade off.  Still, every time, I go through the same thing.

And what do you think I did AFTER I ate the pizza?  Yeah, you’re right.  I cooked.  Kind of ironic, huh?  Or maybe not.
Anyways, this soup didn’t take long at all and it fed right into my laziness since I put corn on the cob right into the soup to cook. instead of cooking it and then de-kernelling it (have we determined the correct word for that yet?).

Lazy Potato Leek Corn Soup

  • 2 leeks, chopped and washed well
  • 1/2 onion, chopped
  • 1 tbsp butter
  • 1 tbsp flour
  • 4 small potatoes
  • 3 ears of corn, shucked and broken into pieces
  • 3 pints of stock – veggie stock makes this a wonderful vegetarian soup!
  • salt and pepper

Melt the butter and cook the leeks and onion for a few minutes.  While this is cooking, I cut the potatoes and shucked the corn.  By the time I was finished, the leeks and onions were soft so I added the flour to make yet another roux.  I’ve been in love with this method the past few weeks, can you tell?  I added the stock and let it come to a simmer, then added the potatoes and corn and let it all cook for about 20 minutes.

The worst part of this soup?  Just how good it smells, and I’m not hungry anymore!

The best part?  The PURPLE POTATOES!!! Did you know they came in all purple? And all red? And there are so many other types of potatoes besides the few that I knew about.  They aren’t typically in the grocery store, although I have seen the purple ones recently.  I was so silly excited when I picked up these purples from my farmer that he gave me a mini potato lesson.  I’m totally on a search for all types of potatoes now.

This is why my soup has a purplish hue! 🙂

Beef Stew

Well, the time has finally come. I know it’s here because it was below 50 degrees when I woke up this morning.  There was frost on the cars outside.  So, it’s time.  Time to bring in the herbs overnight.  Time to pull out the jeans and sweatshirts and make sure they are clean and ready to go.  Time to get heavy socks and long johns (yes, long johns).

Don’t get me wrong – I love the fall and I love the winter.  I love getting bundled up.  I love getting unbundled and cozy in a warm house.  I love waking up to frost and going to bed under a heavy blanket.  I love the still and the quiet than comes with the cold.  I love that it forces a pause to life before spring wakes.

I realize there will be summer like weather still, and I will fully enjoy being outside in the warm while I still can.  However, I am looking forward to cool weather, bonfires, coats and cozy nights while it snows outside and I’m inside eating a hearty stew.

Beef Stew

  • 1/2 lb leftover cooked chuck roast
  • 1 onion
  • 1 carrot
  • 2 cloves garlic
  • a large potato or a few small ones
  • a cup or so of green beans
  • 1 quart of stock
  • butter or olive oil
  • all green herbs you have that you think will taste good together  plus salt and pepper (seriously, this is how I decided what to season the stew with) If you want specifics, I used 2 Bay Leaves, thyme, sage, basil, tarragon, parsley and rosemary

Saute the onion and carrot in olive oil or butter until they are soft. Add the garlic and saute for a few minutes.  Follow with the green beans.  When they are bright green, add the chicken stock and bring it all to a simmer.  Add any herbs you like and the potatoes and let it simmer for 30 mins to an hr, depending on when you want to eat.  When you’re ready, add the chuck roast in and shred it as it warms.

While I wait for fall and winter to truly start, I’ll take my own pause and remember there are plenty of warm days left to enjoy…

And miles to go before I sleep,
And miles to go before I sleep.
~Robert Frost


Post Navigation